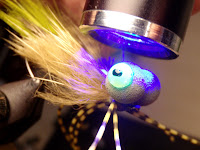
The Booby Frog fly was designed to look, move and float the way a real frog does on a pond, but stay easy to cast with a lighter fly rod and remain completely snag free. Arguably the most common and enjoyable type of top-water bass fly is some sort of cork or spun deer hair popper tied with the general size, shape and color of a frog. These flies have the ability to fool many un-pressured fish, but lack the subtlety and movement to do well on every body of water and in all seasons. Like a real frog, the Booby Frog does not always float…and when it does, it sets in the surface film of the pond at a 45 degree angle with it’s legs splayed out and just the big foam eyes popping out of the water. And the fisherman need only touch the fly line to get the front-facing rubber legs to twitch back—often being just the right trigger for the big bass lurking nearby. This fly has so much great movement and action in the water because the natural materials are not bound to the entire length of the hook shank. The Booby Frog is tied on a large stinger-style hook, but all the materials are tied in at the same 3/16th of an inch of the hook shank directly behind the eye of the hook—this allows the frog body no restrictions in movement. Also, this frog may be the first ever to offer the bass fisherman a top water fly that rides hook point up (almost out of the water!) completely eliminating the need for any cumbersome and distracting hard-mono weed guards that only partially work. The Booby Frog casts easily with a common trout-weight fly rod and crawls easily and seductively over even the thickest weed beds, logs and lily pads.
Booby Frog Recipe:
Hook: Gamakatsu B10S Size 2
Thread: Danville
Body Bottom: Marabou (Cream) Wapsi (MB002)
Body Middle: Marabou (Golden Olive) Hareline Dubbin, Inc. (M8BQ159)
Body Sides: Mink (or Squirrel) Zonker Strips (Olive Brown) Wapsi (MKZ089)
Body Top: Grizzly Marabou (Olive) Hareline Dubbin, Inc. (GRIZM263)
Foam Eyes: Rainy’s Olive Foam Boobie Round Eyes X-Large (BE-09144)
Legs: Montana
Hard Eyes 1: Loon Outdoors UV Fly Paint (Yellow)
Hard Eyes 2: Black Sharpie Marker
Hard Eyes 3: Loon Outdoors UV Fly Finish (Clear) (Or UV Knot Sense)
Booby Frog Tying Instructions:
Step 1: Build a 3/16th inch thread base directly behind the eye of a Gamakatsu B10S Size 2 hook using Danville’s 3/0 Waxed Monocord (Dark Gray).
Step 3: Tie in two clumps of Marabou (Golden Olive) on top of the cream marabou. These should extend out well past the cream marabou and 5/8th of an inch past the outside bend of the hook, making the overall length of the fly—without the legs—3 inches. Lick your fingers and slick back the marabou allowing you better control of the material.
Step 4: Tie in a Mink (or Squirrel) Zonker Strip (Olive Brown) to either side of the fly. Trim the leather part of the zonker strip to ½ inch. This should make the overall zonker about 2 inches long.
Step 5: Tie in two Grizzly Marabou (Olive) feathers on the top of the fly.
Step 6: Mount the Olive X-Large Foam Boobie Round Eyes onto the head of the fly using cross wraps of thread just as you would when mounting a lead dumbbell eye.
Step 7: Flip the fly over and tie in two sets of Medium Speckled Yellow Centipede Legs. Tie them in so that they extend out well past the hook eye and the rear of the fly. Tie off the thread between the foam eyes and the rubber legs using an extended-reach whip finish tool. Trim the front four legs to 1 inch. Trim the rear four legs to 2 inches. Apply a small amount of head cement to the thread built up between the two sets of rubber legs. Be careful not to get any cement on the actual rubber legs, as this will “rot off” the legs over time.
Step 8: Exaggerate the hole that runs through the foam Boobie eye so that the UV Fly Paint can ooze down in and have a better, more durable hold on the foam once cured. I prefer the butt end of my whip finish tool because it is already handy.
Step 9: Apply a small drop of UV Fly Paint (Yellow) into the opening of the foam eye.
Step 10: Cure the UV Fly Paint with the Loon Outdoors UV Power lamp.
Step 11: Create pupils using a Black Sharpie Marker.
Step 12: Apply a small amount of UV Fly Finish (Clear) (Or UV Knot Sense) over top of the now hardened eye. This ensures the black Sharpie pupil remains permanent.
Step 13: Cure one last time with the Loon Outdoors UV Power lamp. Finish with a final coat of Hard-as-Hull head cement to get a glossy look to the eyes.
Now go take him fishing!


No comments:
Post a Comment
Note: Only a member of this blog may post a comment.